What Is This App?
Dukes App is a driving companion app for your iPhone. It connects wirelessly to a radar detector and displays alerts on your phone with detailed information like signal direction, strength, and distance.
Even without a detector, the app shows community-reported police sightings (real-time reports from other drivers), speed camera and red light camera locations, community hazard alerts, and turn-by-turn navigation — all on a single map. Think of it as a smarter, more visual way to stay aware of what’s ahead on the road.
Quick Start
Essential setup in a few steps. Regional downloads on Wi-Fi are strongly recommended for the best map experience.
Before You Start
Open the App & Find Settings
Open Dukes App on your iPhone. When iOS asks, allow Location and Bluetooth so the app can follow you on the map and pair with your detector. Notifications are optional (useful for border-crossing legality alerts).
On the main map, tap Settings on the bottom bar to open the drawer. Use the Bluetooth tab to pair hardware, or App Settings for units, alerts, and downloads. The in-app welcome tour covers the same basics if you prefer to learn there first.
Essential Setup
Enough to drive today. You can add recommended downloads afterward on Wi-Fi.
Pair Your Detector
From the map, tap Settings → Bluetooth, then Scan. Select your detector when it appears. Power on the detector and stay within a few feet for the first pair.
Supported detectors: Uniden R4, R4w, R8, R8w, R9, R9w; Radenso DS1; and Valentine One Gen2 (V1G2).
Don’t have a detector? Turn on Standalone Driving Mode under App Settings → Driving & Modes (classic: Settings → General). You’ll still get police reports, camera alerts, navigation, and overlays.
Pair Your Laser Jammer (Optional)
If you have an AL Priority (ALP) laser jammer, open Bluetooth in the drawer, scroll to Laser Defense, and tap Scan. Enter the PIN on the unit to pair.
Configuration profiles can be switched from the app after setup. No laser jammer? Skip this step.
Set Your Units
App Settings → Driving & Modes → Units: pick KM/H or MPH and matching distance units.
Configure Alerts
App Settings → Alerts & Audio for radar banners, colors, and voice. Road Alerts for speed/red-light cameras and hazards. Enable what you want to see and hear while driving.
Community police alerts need Custom Feeds configured (drawer tab or Road Alerts). See the Custom Feeds section below if those alerts are missing.
Drive
Keep Keep Screen On under Driving & Modes, mount the phone where you can glance safely, and drive. The app reconnects to your detector, shows live alerts, and learns false-alert locations over time.
Recommended Downloads (Wi-Fi)
These regional packages noticeably improve the map. Download your state or province on Wi-Fi before a long trip when you can. You can drive without them, but overlays, speed limits, and risk scores work best with local data installed.
CSA Enforcement Overlays
App Settings → Map & Display → CSA Overlay — download packages for your region. Warmer map colors show roads with more historical enforcement activity. Covers Canada, the United States, Australia, and New Zealand.
Speed Limit Packs
Enable Show Speed Limit on the same screen. Then open Enhanced Speed Limit Data (or Data & Downloads → Speed limit packages) and download your state or province. Packs are used before online lookup and work offline. After GPS lock, the map may prompt you once; use the pencil on the map to fix a wrong limit.
Risk Score Packages
Turn on Show Threat Intelligence under Map & Display, then download Radar Risk Score Packages for your region (same area as CSA downloads, separate files). These refine the live risk score banner or map badge with local enforcement patterns.
Map & Daily Driving
The app is built around a single live map. These are the controls and drawer tabs you use every day.
Map Bottom Bar
Along the bottom of the map (not a traditional tab bar):
NAV — Opens navigation search when you are not navigating. While navigating, tap the blue Nav control to open the route card (end route, overview, follow options).
Recenter — Centers the map on your location and re-enables follow mode.
Settings — Opens the bottom settings drawer.
Custom or V1 Custom — Quick-toggle for your saved Uniden or V1 custom detector profile (when configured).
ALP [profile] — Cycles AL Priority configuration profiles when your laser jammer is connected.
Settings Drawer Tabs
Open Settings on the map to reach these tabs. Some tabs hide when Hide Detector-Specific Controls is on or when your detector does not use K Blocks.
App Settings — Modern settings hub (Appearance, Driving & Modes, Map & Display, Alerts, Road Alerts, Navigation, CarPlay, Data & Downloads, Backup & About). Includes global settings search.
Bluetooth — Pair and manage detectors, AL Priority, Flic 2 buttons, and TMG laser jammer (beta).
Default Settings — Capture and push Uniden Default and Custom profiles to the detector hardware.
Geofences — List, draw, and edit zones that auto-apply detector settings on enter/exit.
K Blocks — Per-frequency K-band filters for BSM false alerts (Uniden models; not DS1 or V1).
Muting — GPS lockouts, dynamic muting, bogey tones, lockout map, import/export.
Encounters — Alert session history (Feed, Map, and Insights views).
Custom Feeds — Add community police/data feeds, bundles, and quick setup.
Community Reports
The Report button is at the bottom-right of the map.
Tap — Opens the full report sheet (police, traffic, crash, hazard, weather, road closed, and more).
Long-press (~1.5 seconds) — Submits a quick Police Visible report at your current location without opening the sheet.
On CarPlay, the report button opens the same categories in a grid menu (not only instant police). Submenus include traffic (jam / heavy / standstill), crash types, hazards, and weather.
Custom Feeds
Community police and related alerts come from feeds you configure under the Custom Feeds drawer tab or App Settings → Road Alerts.
Add feeds by URL with optional headers, refresh mode (smart or standard), and protocol options. Use Quick Setup or import/export feed bundles to share configurations between devices.
Encounters
Every driving session with radar activity can be saved as an encounter for later review.
Open the Encounters drawer tab for three views: Feed (searchable list), Map (sessions on the map), and Insights (patterns and analytics). Export or import encounters, add labels and notes, or clear all data from the menu.
Integrations & Shortcuts
Navigate with Dukes (Share Extension) — Share a map link or address from Safari or Maps and choose Navigate with Dukes to start routing in the app.
Siri — Voice commands include navigate Home/Work/favorites, search an address, report police, open the app, and cancel navigation (phrases like “Dukes report police” or “Dukes search address”).
External map links — The app can open coordinates and searches from Apple Maps or Google Maps style links.
Onboarding & Tours
First launch offers a guided demo (pair detector, alerts basics, speed limits, lockouts). Replay Onboarding is under Backup & About. The Power Features Tour covers geofences, default settings, K Blocks, Ka mute override, and related topics.
Understanding Your Alerts
When a signal is detected, the app shows a colored banner on screen. Each color and label tells you the type of threat. Here’s what each one looks like and what it means.
Radar Bands
Police radar guns operate on different radio frequencies called “bands.” Each band has its own color so you can tell them apart instantly.
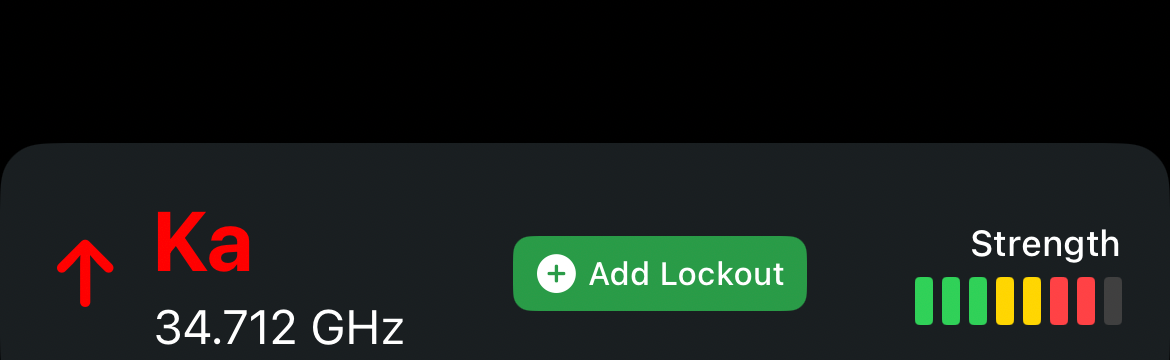
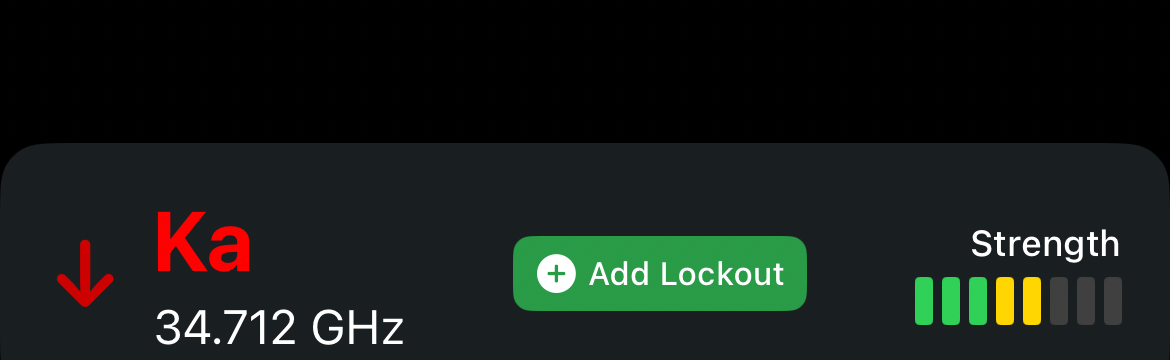
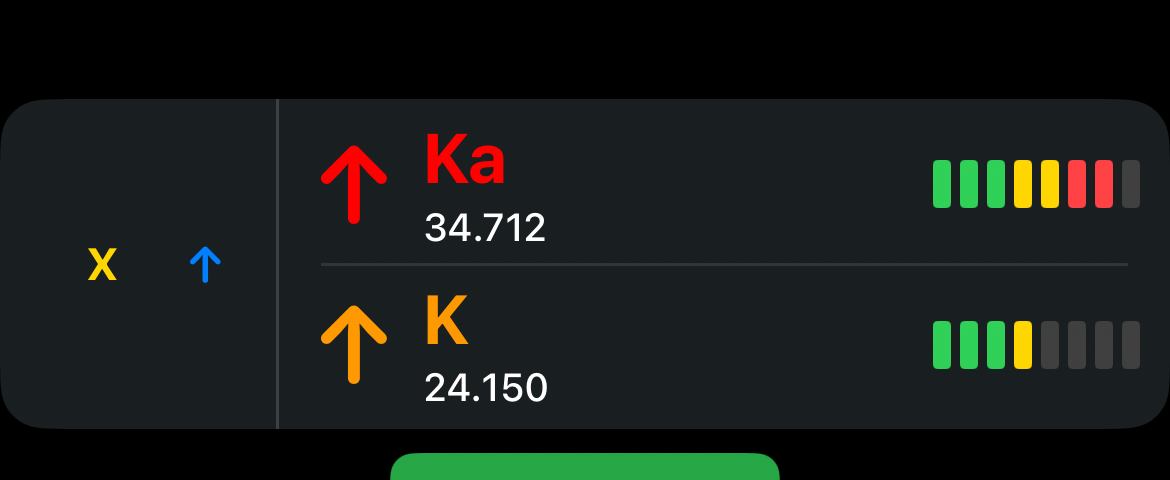
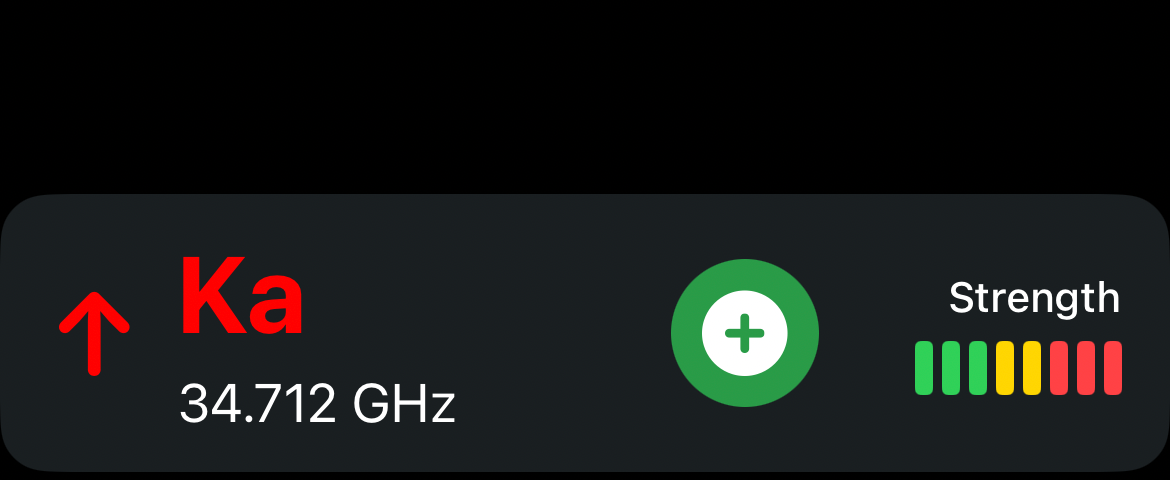
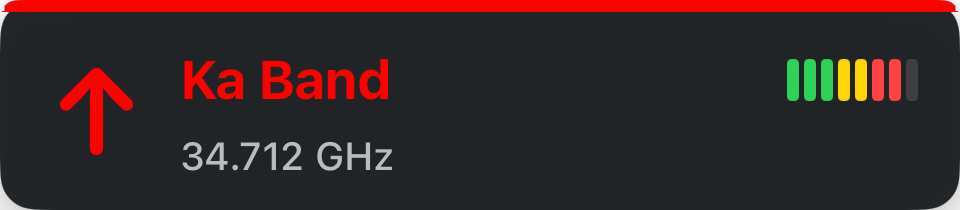
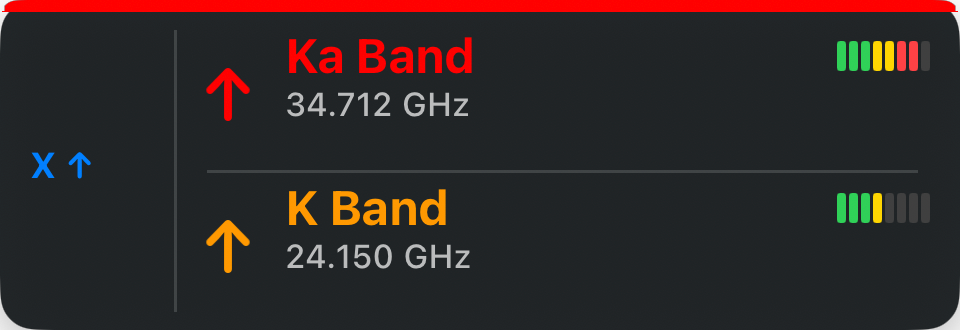
Ka Band
The most common frequency used by modern police radar guns. Treat every Ka alert seriously. The bar shows signal strength — more bars means the source is closer.
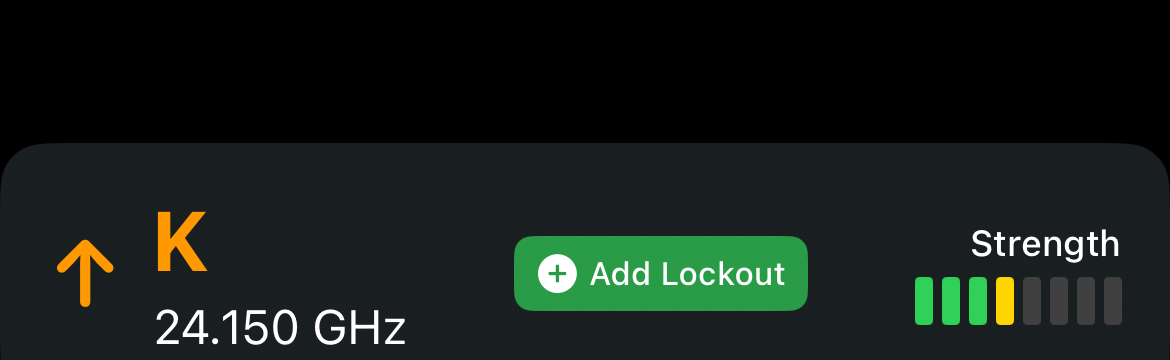
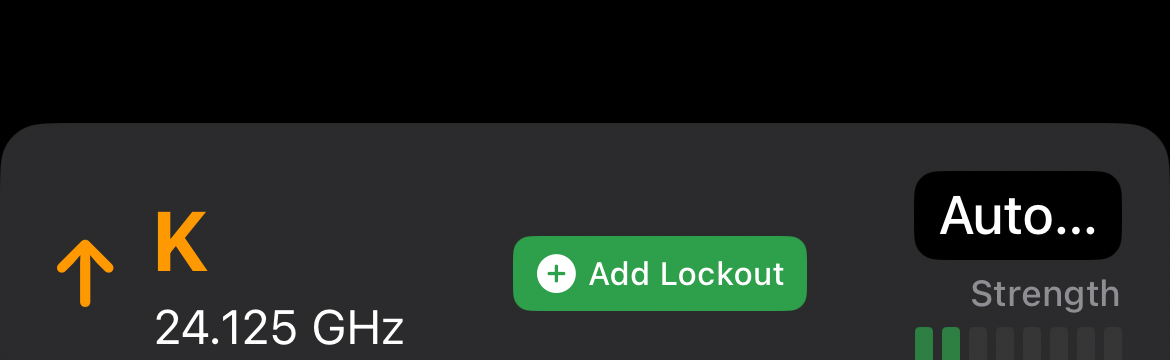
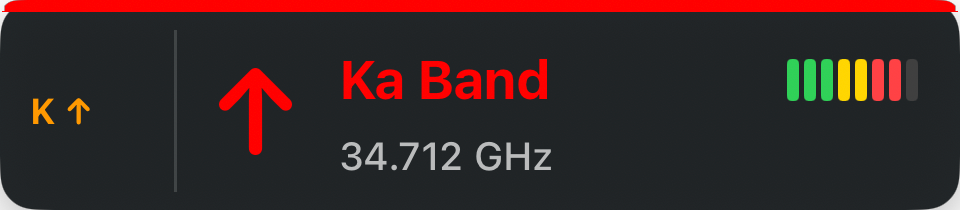
K Band
Widely used by police but also triggered by vehicle blind-spot monitors, automatic doors, and speed signs. Common in urban areas. Context matters — K on the highway is worth attention.
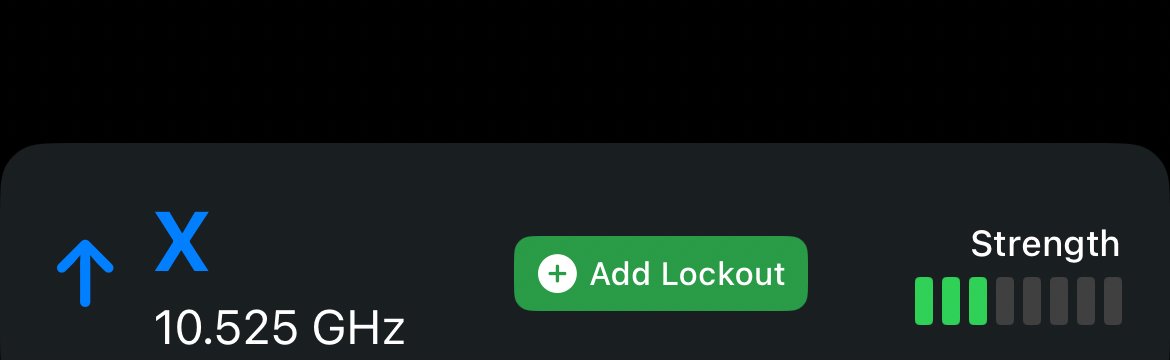
X Band
An older frequency. Most X band signals come from automatic doors and motion sensors. Rarely used by police in North America but still active in some areas.
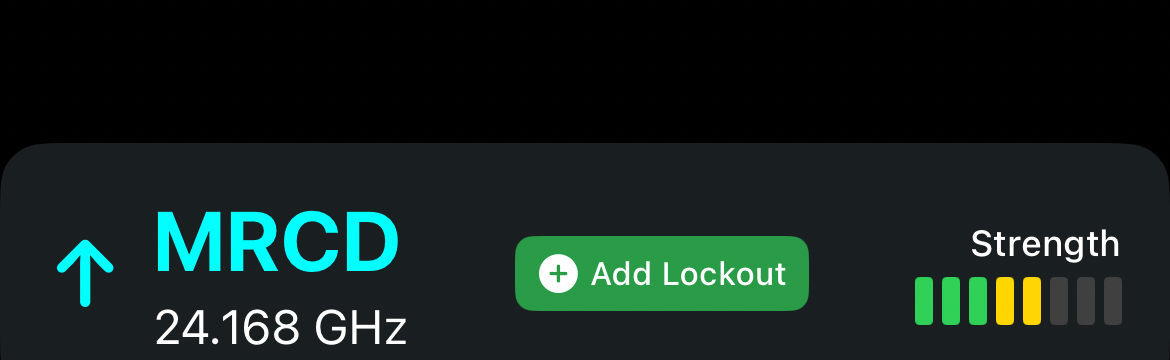
MRCD (MultaRadar)
A type of photo radar used in some regions. Uses a different detection method than traditional radar, so your detector needs MRCD support enabled to catch it.
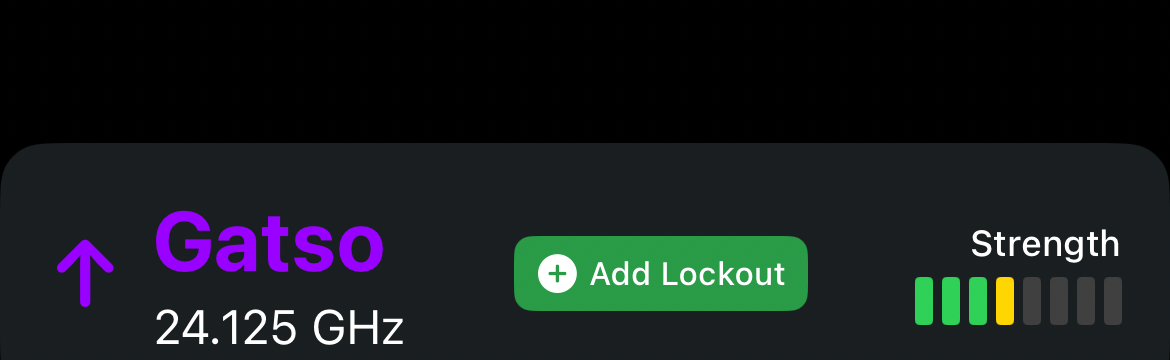
Gatso
A brand of automated photo-radar speed camera. These fixed units photograph vehicles exceeding the speed limit. Detected by compatible radar detectors.
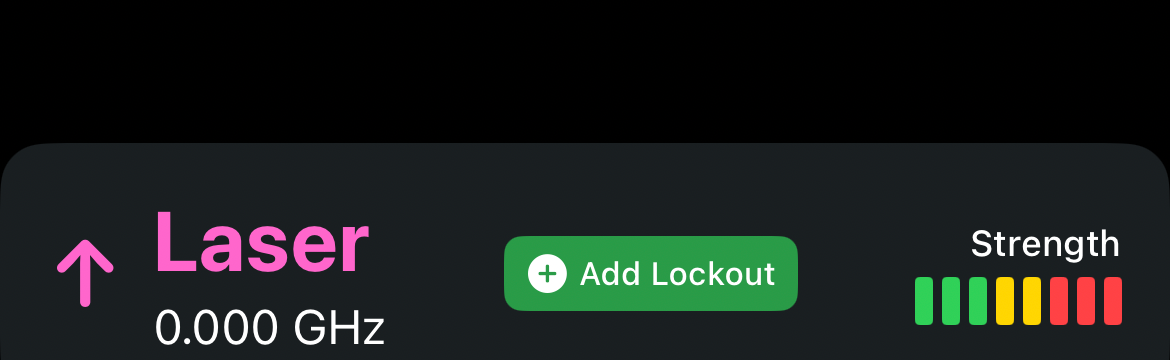
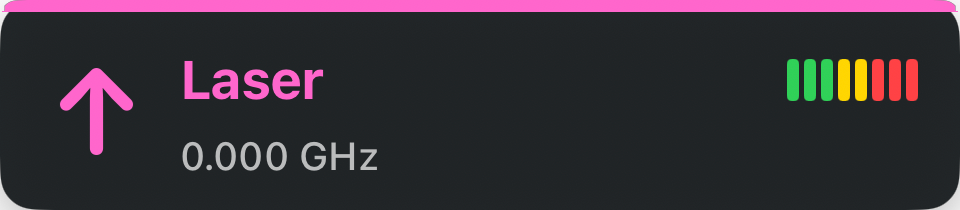
Laser
Police laser (LIDAR) speed gun. Laser is extremely precise and targeted. By the time your detector picks it up, the officer is already measuring your speed. A laser jammer is the only proactive defense.
Direction & Multi-Signal
The app tells you which direction a signal is coming from, and what happens when multiple signals are active at once.
Rear Alert
The arrow points backward, indicating the signal is coming from behind you. This could mean a patrol car is approaching from behind or a radar gun is aimed at your direction of travel from the rear.
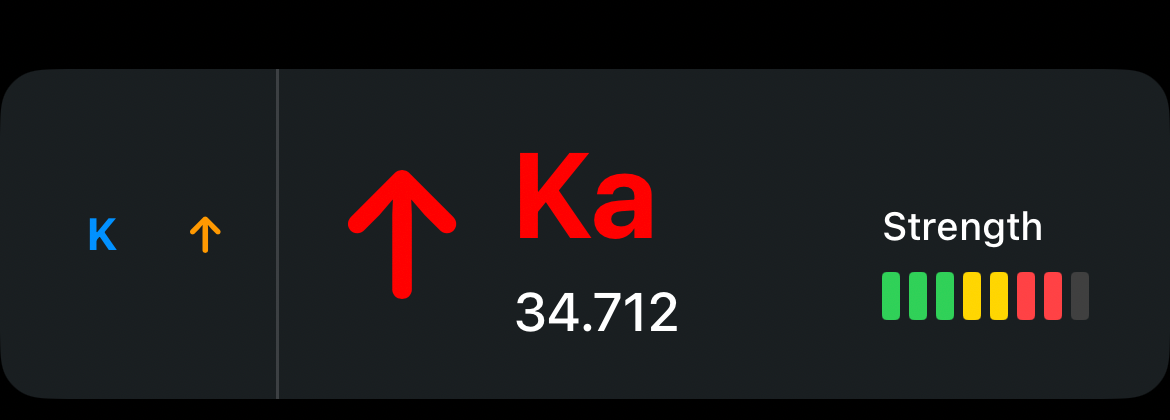
Consolidated View
When Consolidated banner mode is selected in settings, multiple active signals are combined into a single banner. The strongest/highest-priority signal is shown prominently, with secondary signals listed below.
Expert Consolidated
Also available: Radar Direction View — directional banner with a map cone showing signal bearing; optional HUD placement during navigation. Experimental Adaptive RDV Learning can tune clarity by band under advanced alert settings.
Shows detailed frequency and signal information for advanced users. All active bands are displayed with their exact frequency, strength bars, and direction arrows in a single view.
Muted & Locked Out Alerts
Not every signal is a threat. The app learns which locations produce harmless signals and can silence them automatically.
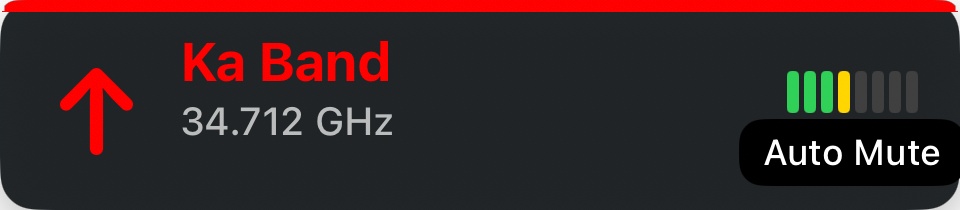
Muted Alert
A greyed-out banner means this signal has been muted — you or the app has determined it’s not a real threat. The signal is still being tracked, but it won’t sound an audible alert.
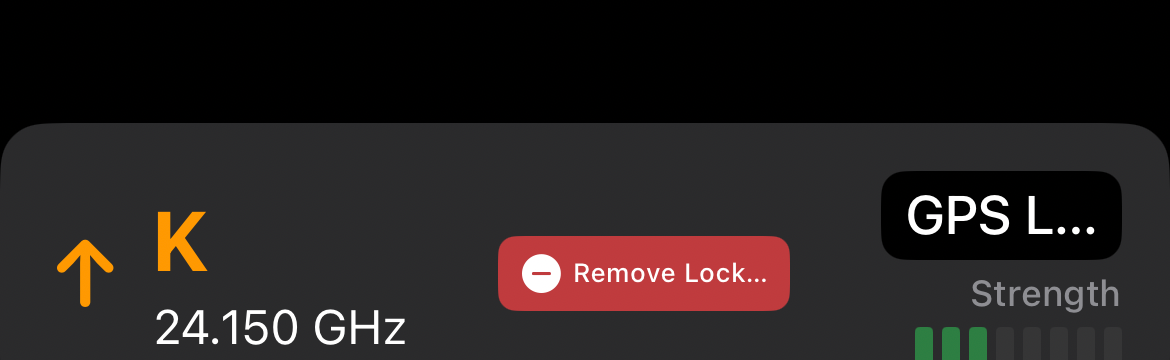
GPS Lockout
This location has been locked out — the app has memorized this spot as a false-alert source (like a store’s automatic door). The signal is detected but fully silenced. Lock & unlock icons let you manage the lockout on the fly.
Large Banner Mode
When Large banner size is selected, alerts are displayed bigger for easier visibility. This mode shows up to 2 banners at once instead of 4.

Tiny Muted Pill
When Tiny Muted Banners is enabled, muted signals appear as compact pills showing just the band, frequency, and strength. Keeps your screen clean while still giving you awareness of what’s around.
Camera Alerts
The app warns you when approaching known camera locations from its database of 18,000+ verified cameras. Enable these under Settings → Safety Alerts.

Speed Camera
A fixed camera that automatically photographs vehicles exceeding the speed limit. Alert appears at your configured distance (default 400m).

Red Light Camera
A camera at an intersection that photographs vehicles running a red light.

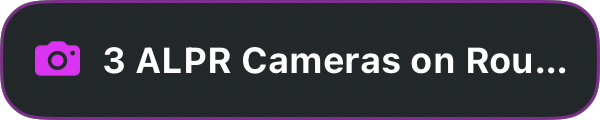
License Plate Reader (ALPR)
Automatic License Plate Recognition cameras photograph every passing vehicle’s plate. Not a speed camera, but some drivers prefer to know their locations.

Multi-Camera
When multiple cameras are near each other (e.g., a speed camera and red light camera at the same intersection), they’re shown together in a split banner.
Community Hazard Alerts
Real-time hazards reported by other drivers. Enable under Settings → Safety Alerts → Hazard Alert Banners. The app supports many hazard types — here are the most common.

Car Stopped
A vehicle stopped on or beside the road ahead.

Accident
A crash or collision reported ahead on the road.

Construction Zone
Active roadwork or construction ahead.

Emergency Vehicle
An emergency vehicle reported on the road ahead.
Other hazard types include: weather, ice, fog, flood, objects on road, and potholes.
Aircraft Awareness
Some jurisdictions use aircraft for aerial speed enforcement. The app tracks nearby aircraft using live ADS-B data and classifies them by threat level. Enable under Settings → Safety Alerts → Aircraft Awareness.
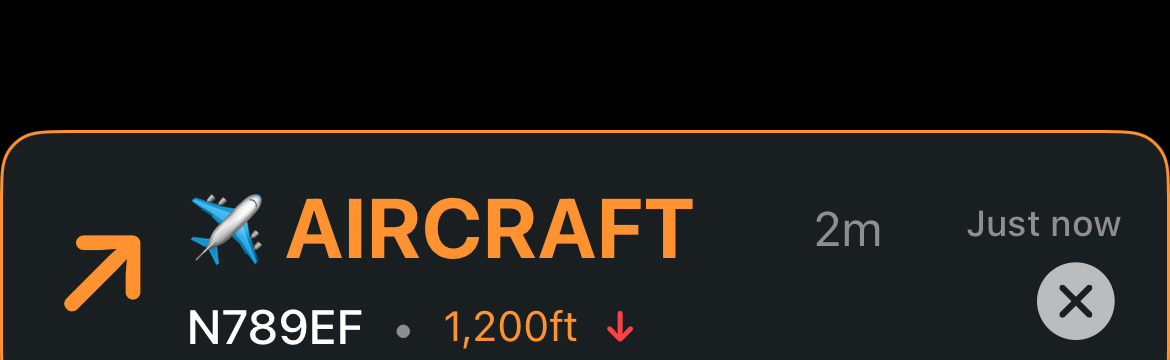
Suspicious Aircraft
An aircraft flying in a pattern that could indicate enforcement — low altitude, loitering behavior, or matching known enforcement profiles.
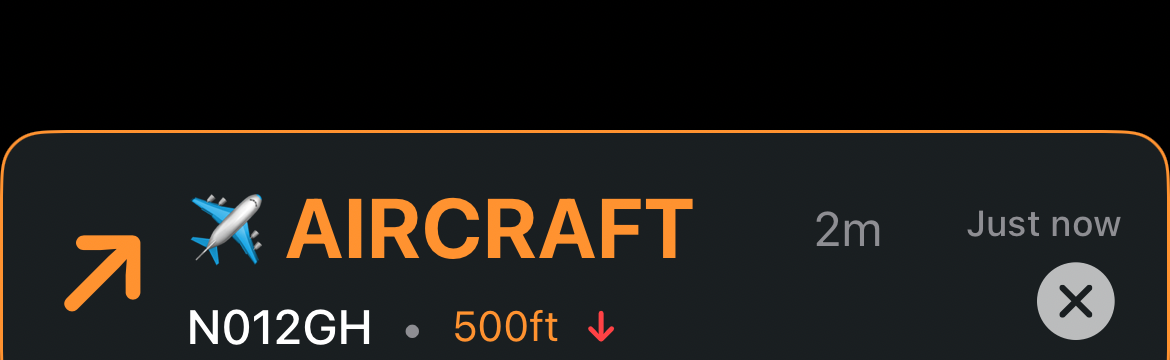
Threatening Aircraft
High-confidence match for aerial speed enforcement. Very low altitude, slow speed, circling pattern, or confirmed enforcement aircraft registration.
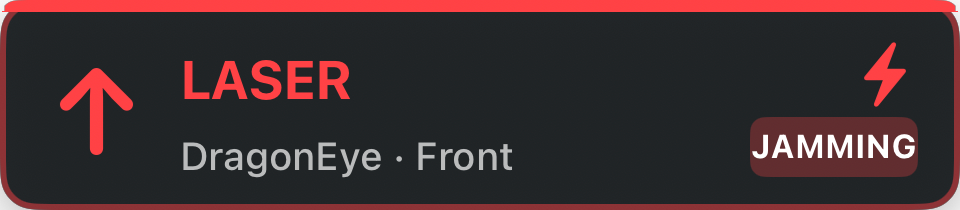
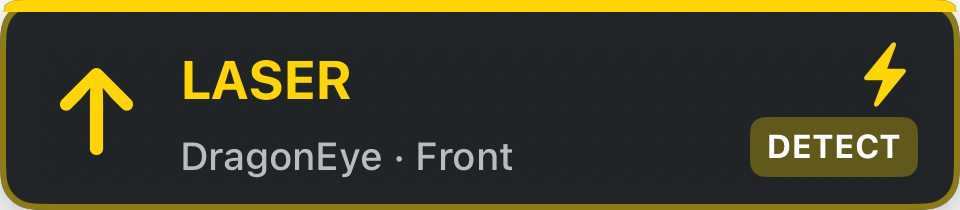
Laser Defense (ALP)
If you have an AL Priority (ALP) laser jammer installed, the app connects to it over Bluetooth and shows real-time laser alerts with jammer status.
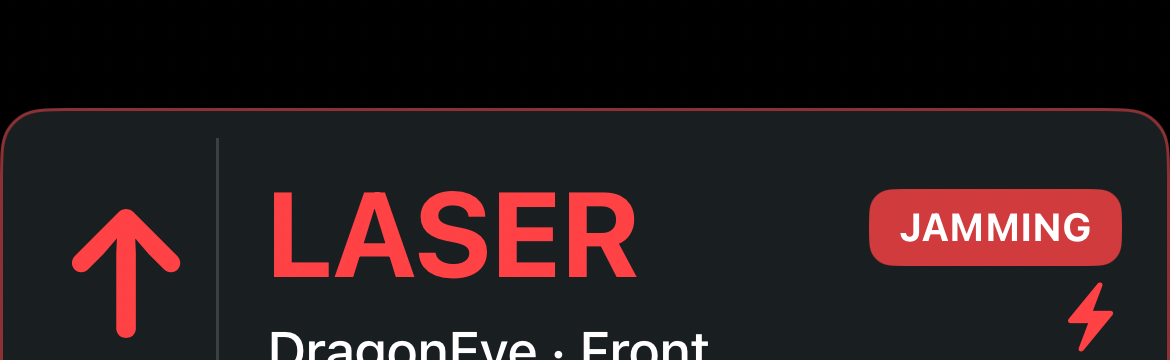
Laser Jamming (Defense Mode)
Your ALP jammer has detected a laser gun and is actively jamming it. The banner shows the laser gun type (e.g., DragonEye) and which sensor detected it (front/rear). You have time to adjust your speed before disabling the jammer.
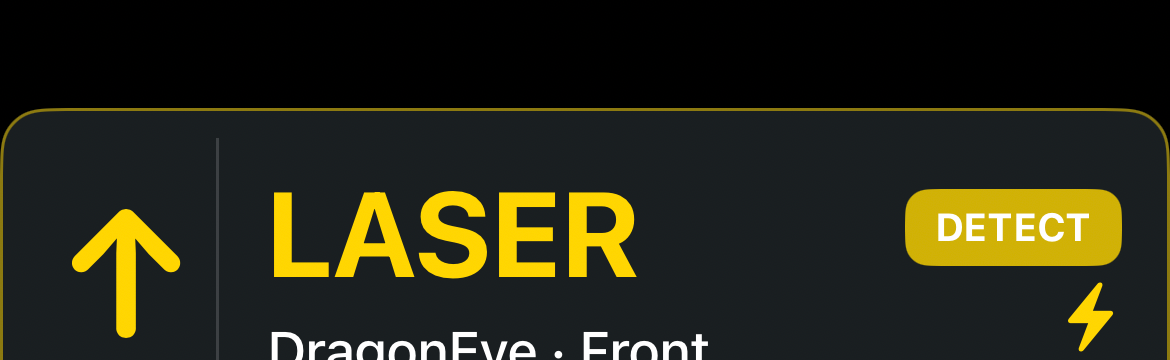
Laser Detection Mode
ALP is in receive-only mode — it detects the laser but does not jam. Useful in areas where jamming is not permitted. Shows the same laser gun identification and direction info.
To connect your ALP: go to Bluetooth & Detector, scroll to the Laser Defense section, and tap Scan. You’ll need to enter the PIN shown on your ALP unit on first pairing.
Key Features
The core features that make the app work for you day-to-day.
GPS Lockouts
GPS lockouts are the app’s way of learning which signals are harmless. Automatic store doors, vehicle sensors, and motion detectors all trigger radar alerts — but they’re always in the same location. The app memorizes these spots and silences them over time.
How it works: Drive past a false alert several times (default: 3 passes). The app records the location and frequency. Once it’s confident the signal is always there, it creates a lockout — a GPS-tagged zone where that frequency is permanently silenced.
Manual lockouts: Don’t want to wait? Long-press the lock icon on any active alert banner to immediately lock out that location.
Highway Guard: At highway speeds, the app becomes more cautious about creating lockouts. This prevents accidentally silencing a real police radar that happens to be near a known false-alert spot.
Ka Override: Even when you’ve manually muted alerts, a new Ka band signal will automatically unmute the app. Ka is almost always real police radar.
Muting & Auto-Mute
Beyond GPS lockouts, the app offers several ways to reduce noise without losing awareness.
Low-speed mute: Automatically silence X and K band alerts below a set speed. Perfect for parking lots where automatic doors constantly trigger false alerts.
Quiet Ride: Your detector’s built-in quiet mode that silences alerts below a set speed. Configurable in Detector Settings.
K-Blocks: Frequency windows that tell your Uniden detector to ignore specific K band frequencies known to cause false alerts from vehicle safety systems (blind-spot monitors, adaptive cruise control). Choose from Default, Aggressive, or Disabled presets, or fine-tune individual blocks.
Dynamic muting: Set signal-strength thresholds per band — weak signals are silenced, strong signals always alert.
Geofences
Geofences are virtual boundaries you draw on the map. When you drive into or out of a geofence, the app automatically changes your detector settings.
Example: Draw a geofence around your neighborhood and set it to a quiet profile with X and K bands off. When you leave the neighborhood, the app switches back to your default profile automatically.
Creating one: Open the Geofences tab in the bottom drawer, tap +, and draw the boundary on the map. Then configure which settings should change when you enter that zone.
Threat Intelligence
The app combines multiple data sources — community reports, enforcement overlay data, active radar signals, camera locations, and more — into a single risk score for your current area.
The risk score appears as a banner at the bottom of the screen or a compact badge on the map (configurable). Levels range from Neutral through Low, Moderate, High, to Critical. Enable it under Settings → Map & Overlays → Threat Intelligence.
Voice & Visual Alerts
Keep your eyes on the road with spoken announcements and screen flash effects.
Voice Alerts: The app speaks announcements like “Ka band, front” or “Police on Main Street.” Configure per-band, per-type voice alerts under Alerts & Sounds. You can also add frequency and direction to the announcements.
Visual Alerts: The screen flashes a configurable color when certain signals are detected. Each band can have its own flash color, brightness, and pulse count. Enable under Alerts & Sounds → Visual Alerts.
Priority order: When multiple alerts compete, the app follows a priority queue: Laser > Police > Hazard > Camera > Radar > Aircraft > Navigation. You can reorder this under Voice Priority Order.
Default & Custom Detector Profiles
The Default Settings drawer tab lets you sync profiles with your Uniden detector over Bluetooth.
Default Profile — Read the detector’s current settings or push your saved default back to hardware.
Custom Profile — Full editor for bands, city/highway, GPS, display, laser, and expert options. Toggle quickly from the map bottom bar when saved.
V1 Gen2 uses a dedicated V1 settings flow (modes, filters, custom sweeps, BSM+, geofence track) from the Bluetooth tab when connected.
Speed Corridors
Average-speed enforcement zones appear on the map and as alert banners/pills when you enter a monitored corridor.
Custom Locations
Add your own speed cameras, red-light cameras, ALPR sites, speed traps, and waypoints from the map tools or settings. Drop a pin, enter coordinates, or import/export a list. See Map Icons for pin styles.
Flic 2 & TMG (Beta)
Flic 2 — Pair a physical button under Bluetooth. Map single-tap, double-tap, and hold to mute, add a GPS lockout, JTK, or report police.
TMG laser jammer (beta) — Separate Bluetooth integration with status on the map; opens the Bluetooth drawer when tapped from a notification.
Backup & Restore
Export to a .dukesbackup file under App Settings → Backup & About. Includes app settings, GPS lockouts, geofences, custom feeds, cameras, navigation favorites, detector profiles, speed-limit overrides, and encounter sessions. Import restores on another device; use before major updates.
CarPlay
When you connect your iPhone to CarPlay, the app shows a full map with all your alerts, camera warnings, navigation, and speed data on your car’s display. Here’s everything you’ll see.
Map Buttons
Buttons on the right side of the CarPlay map. Tap to control sound, muting, search, and reporting.

All audio plays — voice guidance, alert announcements, everything.

Police, radar, camera, and laser alerts play. Navigation voice is silenced.

All app audio silenced. Visual banners still appear.

Your detector’s physical speaker is active. Tap to mute.

Your detector’s speaker is silenced. Tap to unmute.
Tap to add or remove a GPS lockout at your current location for the active radar signal.
Some custom feeds are slow or stalled. Lockouts still work from cached and local data.
No custom feeds active. GPS lockouts use your locally learned database only.
Custom community feeds are not enabled. Local GPS lockouts still work.
The same button handles manual lockouts; icon color can reflect feed health when custom feeds are configured.

Laser jammer is idle (parking/standby mode).

Jammer in receive-only mode. Detects laser but does not jam.

Jammer is in full defense mode — will actively jam laser guns.

Opens the community report menu (police, traffic, crash, hazard, weather, road closed, and more). Some builds also support a quick police report from the phone map via long-press on the report button.

Open navigation search. Shows favorites, recents, and destination search.
CarPlay Radar Banners
These banners appear at the top of the CarPlay screen when your detector picks up a signal.
Ka Band — Active detection. Shows band, frequency, strength bar, and direction.
Laser — Police laser detected.
Ka Muted — Signal detected but muted (auto-mute or GPS lockout).
Multi-Signal — Multiple bands active. Primary signal shown with secondary below.
Expert Mode — All active signals with full frequency and strength detail.
CarPlay Laser Banners
ALP Jamming — Your laser jammer is actively jamming a laser gun. Adjust speed.
ALP Detection — Laser detected in receive-only mode (not jamming).
CarPlay Community Alerts

Police Alert — Community-reported police location ahead. Shows street name and distance.
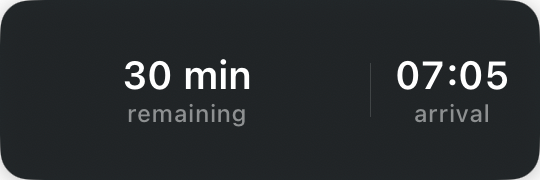
ETA Banner — Shows remaining time, distance, and arrival time during active navigation.
CarPlay Alert Pills
Compact pill-shaped indicators for cameras, hazards, aircraft, ALPR routing, and geofence transitions.

Speed Camera ahead — shows type and distance.

Red Light Camera ahead.

License Plate Reader ahead.

Hazard: Car Stopped — community-reported road hazard.

Aircraft nearby — shows callsign and distance.
ALPR Route Status — shows how many plate readers are on your navigation route.

Geofence Toast — briefly appears when entering a configured geofence zone.
CarPlay Risk Badge
The threat intelligence risk score displayed as a compact circular badge on the CarPlay map. The ring fills and changes color based on your current risk level, with a trend arrow showing whether risk is rising or falling.
Low
Green — 10–29%
Moderate
Yellow — 30–59%
High
Orange — 60–84%
How to enable: Open Settings → CarPlay → Risk Badge and turn on Show Risk Badge. The badge is disabled by default.
Position: By default the badge sits on the right side of the CarPlay map, above the map buttons. Enable Bottom-Left Position in the same menu to move it to the lower-left corner instead.
During navigation: When an ETA banner is active, the badge automatically shifts up above it so both remain visible. Alert banners (radar, laser, police) will cover the badge when they appear since those are higher priority.
CarPlay Display Modes
Under App Settings → CarPlay, choose how navigation appears on the car screen:
Full Navigation — Route line and Apple turn-by-turn guidance on CarPlay.
ETA Mode — Cleaner map with an ETA chip; optional turn preview and next-turn bar. Toggle between ETA and full navigation from CarPlay or Data Mode when configured.
Cluster Directions — ETA-style map plus turn metadata for supported instrument-cluster displays; compact turn card options for newer vehicles.
Map tools — Zoom in/out and related tools from a map tools sheet on CarPlay.
JTK button — With ALP connected, cycles parking / detection / defense. Without ALP, can toggle ETA and full navigation when that option is enabled.
Data Mode (Phone Dashboard)
When CarPlay is connected, your iPhone automatically switches to a Data Mode dashboard — a dark, glanceable display showing real-time driving data. The CarPlay screen stays untouched. When CarPlay disconnects, the phone returns to the normal map.
The dashboard shows four tiles: Radar (priority signal with band, frequency, strength, and direction), Alert (active community reports with street and distance), Speed (current speed with speed limit), and Threat (risk score with trend and confidence). Enable under Settings → CarPlay → Phone Display.
Settings Reference
Every setting in the app, explained. Use the search bar or sidebar to jump to any section.
From the map, open App Settings: Driving & Modes has units, display/heat options (Heat management, Map rendering), and detector / ALP / standalone / docked power modes. Map & Display → CSA Overlay has downloads plus intensity, visibility, and boost controls. Many screens still mirror the classic iPhone Settings → Dukes layout.